
Toys are furniture with interactivity. Anything you might have that does... well, anything, can be a toy. Creating toys requires some knowledge of coding. There are a number of toy creation tutorials that can help you get started.
Coding Tips and Guidelines[]
Assuming Control[]
If you have an action in your toy that should only be performed by one instance of the toy (keeping track of, and publishing the toy's state, for instance), it is best to have one instance take control and perform the action for as long as it has control.
FurniControl.requestControl() and ControlEvent.GOT_CONTROL are the keys to pulling this off. In the example below, we have a ball toy that plays a "roll" animation every 30 seconds. The time to perform this roll is calculated only by the instance that has control of the toy.
Example: Ball with "roll" animation[]
This example assumes that we're writing code in the FAT on the main animation's timeline, and that there is a "ball" MovieClip available, with a "roll" frame defined.
TODO: Actually compile and test this code. It is simple enough that the basics should be right, but it has not been checked by a compiler yet.
import com.whirled.FurniControl;
import com.whirled.ControlEvent;

/*** Settings ***/
const BALL_ROLL_DELAY :int = 30; // in seconds.

/*** Internal Constants ***/
const ROLL_BALL :String = "rollBall";

/*** Initialization ***/

var _timer :Timer;
var _control :FurniControl = new FurniControl(this);
if (_control.isConnected()) {
    // require that one instance of this toy have control - unlike games, control is not
    // automatically assigned to one instance of a toy - but as along as they all request it,
    // control will be moved to a new instance when the assigned controller leaves the room.
    _control.requestControl();

    // The MESSAGE_RECEIVED event is needed to make sure all instances roll when the controller
    // tells them to.
    _control.addEventListener(ControlEvent.MESSAGE_RECEIVED, messageReceived);

    // The GOT_CONTROL event is used to determine whether this instance should be timing the rolls
    _control.addEventListener(ControlEvent.GOT_CONTROL, gotControl);

    // when we are unloaded, we should de-register the _timer's event listener
    _control.addEventListener(Event.UNLOAD, onUnload);
}

/*** Functions ***/

function gotControl (event :ControlEvent) :void
{
    // we have control! set up the timer to send out the ROLL_BALL message at the appropriate time.
    _timer = new Timer(BALL_ROLL_DELAY * 1000);
    _timer.addEventListener(TimerEvent.TIMER, onTimer);
    _timer.start();
}

function onTimer (event :TimerEvent) :void
{
    // we should not lose control once we have it, but it is worth checking to be sure
    if (!_control.hasControl()) {
        _timer.stop();
        _timer.removeEventListener(TimerEvent.TIMER, onTimer);
        _timer = null;
        return;
    }

    // the BALL_ROLL_DELAY time has passed, tell all instances to roll the ball.
    _control.sendMessage(ROLL_BALL);
}

function messageReceived (event :ControlEvent) :void
{
    if (event.name == ROLL_BALL) {
        // ball is a MovieClip defined in another layer.
        ball.gotoAndPlay("roll");
    }
}

function onUnload (event :Event) :void
{
    if (_timer != null) {
        _timer.stop();
    }
}
Keep Component Creation in One Place[]
In regular flash coding, you frequently react to a mouse click on an object by popping up some display immediately, perhaps with an animation, or just by adding one MovieClip to another. In a networked environment, there are two places where you might be tempted to do this: 1) when someone clicks on your own instance, and 2) when someone clicks on another instance in the room, which generates a ControlEvent.MESSAGE_RECEIVED, or ControlEvent.MEMORY_UPDATED which tells the other instances to show the same popup.
Fortunately, when you call FurniControl.sendMessage(), you will also receive that same message on the same instance that sent it. Not only does this make your code simpler, it means the person clicking on the toy will see their popup closer to the same time as the rest of the people. This is often not terribly important, but in some toys it could be critical.
This is not needed when the bit that's being popped up is only seen by the person interacting with the toy, but it should make your code simpler when one person interacts in a way that affects all instances.
In the example below, anybody (not just the controller) can click on the toy to have a random picture popup for everyone.
Example: Random Picture Popup[]
The code is written as in the Ball example (code on the timeline in the FAT). It assumes that there is a Picture class available in this fla that is a MovieClip type, where each frame contains a different picture.
TODO: Actually compile and test this code. It is simple enough that the basics should be right, but it has not been checked by a compiler yet.
import com.whirled.FurniControl;
import com.whirled.ControlEvent;

/*** Settings ***/
const PICTURE_DISPLAY_TIME :int = 30; // in seconds.

/*** Internal Constants ***/
const DISPLAY_PICTURE :String = "displayPicture";

/*** Initialization ***/

var _timer :Timer;
var _picture :Picture;
var _control :FurniControl = new FurniControl(this);
if (_control.isConnected()) {
    // The MESSAGE_RECEIVED event is needed to make sure all instances display the same random
    // picture, at the same time.
    _control.addEventListener(ControlEvent.MESSAGE_RECEIVED, messageReceived);

    // Listen for mouse clicks, and display a random picture.
    addEventListener(MouseEvent.CLICK, onClick);
}

/*** Functions ***/

function onClick (event :MouseEvent) :void
{
    // if the _picture is not null, then there is another picture being displayed - we need to
    // wait before displaying a new one.
    if (_picture != null) {
        return;
    }

    // Pick a random picture, and send a message to display it.  We must instantiate a picture
    // here so we know how many frames are available.
    var tempPicture :Picture = new Picture();
    var picNumber :int = Math.floor(Math.random() * tempPicture.totalFrames) + 1;

    // We don't display it immediately here... this instance will also receive this message, so
    // all of the picture creation and display code can be handled in messageReceived()
    _control.sendMessage(DISPLAY_PICTURE, picNumber);
}

function messageReceived (event :ControlEvent) :void
{
    if (event.name == DISPLAY_PICTURE) {
        // display the picture
        var picNumber :int = event.value as int;
        _picture = new Picture();
        _picture.gotoAndStop(picNumber);
        addChild(_picture);

        // set up the timer to remove the picture after PICTURE_DISPLAY_TIME
        _timer = new Timer(PICTURE_DISPLAY_TIME * 1000, 1);
        _timer.addEventListener(TimerEvent.TIMER, onTimer);
        _timer.start();
    }
}

function onTimer (event :TimerEvent) :void
{
    removeChild(_picture);
    _picture = null;
    // the timer was only scheduled to run once, so we don't need to stop it, or remove this
    // listener.
    _timer = null;
}
Upload![]
- Choose Stuff → Toys to see the toys you own.
- Scroll down to the "How do I get stuff?" section.

Click "Upload" to bring up the interface.
- Click the Upload... button to get the avatar uploading interface.

Toy uploading interface.
- Click on the Name field and enter a name for your toy.
- Click Browse in Toy Media and find the SWF file for your toy.
- Click Browse in Thumbnail Media and find the bitmap (png, jpg or gif) file for your toy's icon. (max. 80x60)
- Click on the Description field and enter a description of your toy. This is only required if you plan to sell it in the shop.
- Confirm that you own the copyrights to the item or have authorization to upload it.
- After the SWF has finished uploading, an icon will show up. You can then click on Save to put your toy in your inventory for use.
Sell![]
- Choose Stuff → Toys to see the toys you own.
- Click the name or icon of the toy you want to list in the shop.
- Click the List Item button to bring up the shop listing interface.

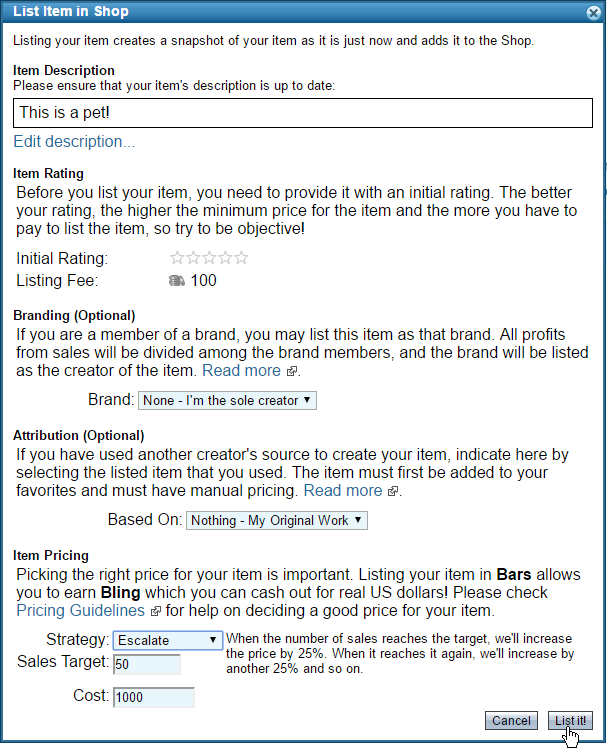
Items in the shop must have a description.
- Item Description: The listed text will appear in the shop on the item's details page.
- Initial Rating: The initial rating you give your item will determine the minimum pricing and listing fee. Read about it in detail here.
- Branding: You can sell the item under a brand in order to share profits with all of the brand shareholders. This is for use with group creation projects. You can read more about it later.
- Attribution: You can also attribute your item, giving credit for the original work. This will affect your listing currency and minimum price. Read about it in detail here.
- Strategy: This setting determines the item pricing strategy. The options are Hidden, Manual (default), Escalate, and Limited Edition. Each option is described to the right when selected.
- Sales Target: This field appears only when Escalate or Limited Edition option selected for Strategy.
- Cost: This number determines the initial cost of your listed toy.
- Click List it! to add your toy in the shop, ready for purchase.