Making your own Flash avatar gives you total control of the look and feel of your avatar. With our template you just create, animate and save, and you're ready to upload! No code required.
Open the Avatar Template, found in ...\whirled\templates\avatar.fla (this is included among the files in the SDK that you installed).
Note: This tutorial assumes you'll be working right over the template file and saving in the same folder as the template. Otherwise you will need to manually set up the required code.
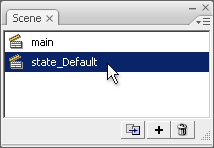
Avatars' various actions and animations are organized into "scenes" in the Flash file. If you do not already have a Scene window, hit Shift-F2 (Window -> Other Panels -> Scene) to bring it up.
Shift F2 brings up the Scene Window.
In the Scene window, click "state_Default" to create your avatar's standard view. The "main" scene just holds the code, which we won't need to change.
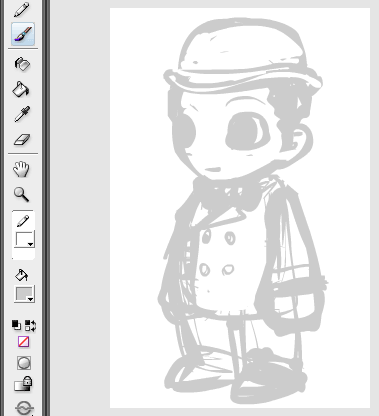
Sketch a simple avatar (a body with two legs and two arms) facing left, with the feet as close to the bottom of the scene as possible without leaving the scene. Center the sketch horizontally in the scene to make sure it flips properly when it faces the other way.
Use a light color to sketch your avatar so you can clearly draw over it.
Click the dot in the lock column to lock the sketch layer so you don't mess it up while drawing in the clean version.
Now you'll draw the separate parts of the avatar (body with head, right leg, left leg, right arm, left arm) on different layers, so that you can animate them.
Click the page icon to make a new layer and double-click its name to change it to "arm right".
Draw a clean version of your avatar's right arm, shoulder to fingertips, right over the sketch.
Select the entire arm drawing by hitting Ctrl-a.
Hit F8 to turn the arm drawing into a Movie clip "symbol" and name it "arm right". Symbols are how Flash bundles up lines and fills into a single unit for animating.
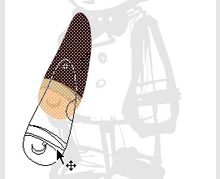
Using the Selection Tool, double-click the new symbol to edit its contents.
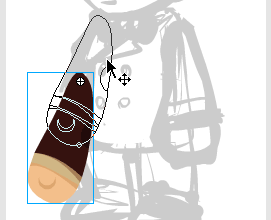
Select all (Ctrl-a) and move the arm so that the shoulder joint lines up over the crosshatch. This is the rotation point for the symbol, so we want it to line up with the rotation we intend. This will move the arm away from the sketch, but that's fine.
Move the arm art so the shoulder is under the crosshatch.
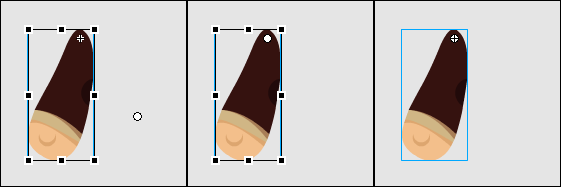
Click "state_Default" to back out of the symbol and return to the full scene.
Use the Free Transform Tool to move the transformation point to the same spot as the crosshatch. This will make it easier for you to rotate the limbs during animation.
Now switch back to the Selection Tool and move the "arm right" symbol so that it lines up over the sketch again. This brings the arm and its rotation point back to where it belongs.
Move the arm symbol so the arm lines up with the sketch again.
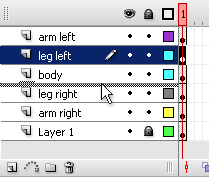
Repeat the above steps for "leg right", "body", "leg left", and "arm left".
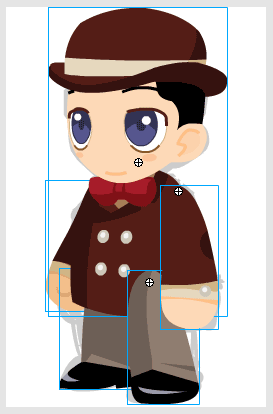
All the parts of the avatar.
Click and drag to rearrange any layers that are out of order so that your avatar looks right with the correct body parts on top of or below other parts.
His legs belong under his jacket.
Select the sketch layer (Layer 1) and use the trashcan icon to delete it now that you don't need it.
Since we're on Frame 15, we'll start animating here.
Hit Ctrl-a to select all the parts at this frame.
Hit Shift-Down Arrow to move the whole avatar down a little on this frame. This will be one point in the natural bob of the walk cycle.
Use the Free Transform tool and rotate the left leg symbol forward and the right leg symbol back, to give the avatar a stride.
Rotate the arms so that the right is forward and the left arm is back. When you walk, you swing your arms in the opposite direction of your legs, to keep balance.
Rotate the legs and arms in opposite directions to set a walking pose.
Click Frame 5 to pose the opposite end of the walk cycle.
Select all (Ctrl-a) and hit Shift-Down Arrow to bob the avatar here too.
Rotate all the limbs the opposite from before: left leg back, right leg forward, right arm back, left arm forward.
Flash can fill in all the frames between our keyframes automatically. Click and drag to select all the active frames of all the layers.
At the bottom of the screen under Properties, set "Tween" to "Motion". This makes Flash automatically animate between the keyframes you just set.
Hit Enter to watch your animation. Select and tweak any frames or symbols you think need improving.
Save As your file with a convenient name. This is your source file for creating this avatar. Make sure you save your file in the same folder as the template.
Choose File → Publish to output a swf file of the avatar. This is the file you'll upload to Glowbe.
The example used in this tutorial can be found in ...\whirled\examples\avatars\FATexample\FATexample.fla (this is included among the files in the SDK that you installed).


